Most teams are still treating AI coding agents like a terminal command: paste a prompt, get some code, repeat. There’s no structure, no context, no accountability. The agent doesn’t know what the project is. It doesn’t know what’s already done. It doesn’t know what “done” even means for this task.
That’s not a team member. That’s a very expensive autocomplete.
In this guide, you’ll see exactly how to bring an AI agent – Gemini CLI in this walkthrough – into a real project structure inside CoMng.AI. You’ll create the project, define epics, break them down into child tasks, add Gemini CLI as an AI Agent team member, generate a structured work order, run it through Gemini CLI, and watch the project update automatically as work progresses.
This is what ai agent task management actually looks like in practice.
What Does It Mean to Add an AI Agent to Your Project?
Project planning with AI agents means treating your AI coding tool – Claude Code, Gemini CLI, GPT-4o, Devin, whatever you use – as an actual team member with assigned tasks, tracked progress, and documented outputs. Not a side conversation. Not a copy-paste workflow.
In CoMng.AI, you add an AI agent as a named team member just like any human. You assign tasks to it. You generate a structured AI agent work order – a markdown document packed with task context, priorities, due dates, dependencies, and full project scope. You hand that to the agent. It works. The project updates.
This matters because AI coding agents fail not from lack of capability, but from lack of context. When your agent knows it’s working on a specific set of tasks within a 10-week project, understands dependencies, and has clear acceptance criteria – the output quality improves dramatically.
CoMng.AI is the first platform built specifically for this workflow.
The Demo Project: Personal Finance Dashboard App
For this walkthrough, we’re building a Personal Finance Dashboard – a React + Node.js web app where users can connect bank accounts via Plaid, automatically import and categorize transactions, and visualize spending patterns on an interactive dashboard.
This is a realistic mid-size project with clear delivery tracks. It’s the kind of project where an AI agent can own entire development epics – which makes it perfect for demonstrating autonomous project management end to end.
Step 1: Create the Project
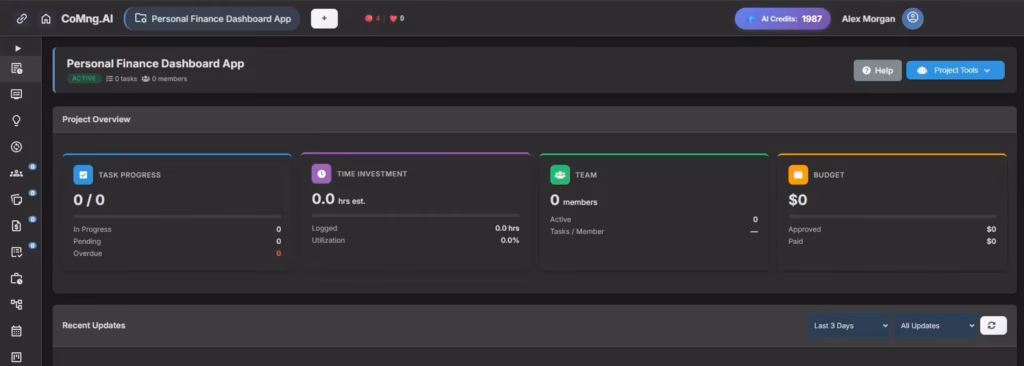
Open CoMng.AI and create a new project. Enter the project name and a detailed description covering the tech stack, team structure, timeline, key requirements, and success criteria. Click Suggest Fields with AI and CoMng.AI pre-fills goals, milestones, risks, scope, stakeholders, and requirements automatically.
In seconds, you have a fully instrumented project – not a blank board.
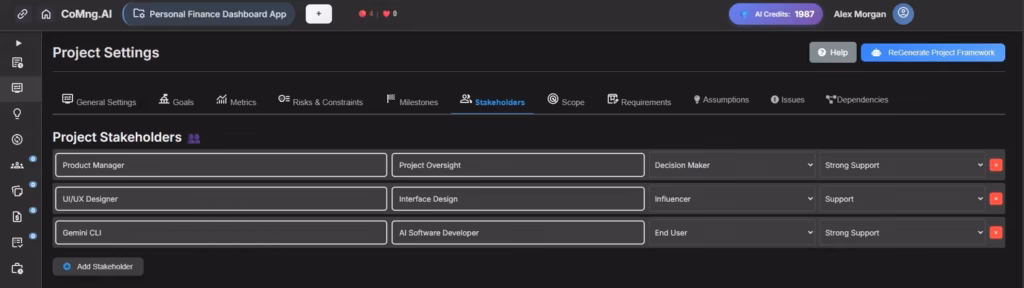
Notice that CoMng.AI has already identified the three stakeholders from the project description: the Product Manager, the UI/UX Designer, and Gemini CLI as the AI Software Developer. The AI read the project context and added them to the stakeholder register automatically.
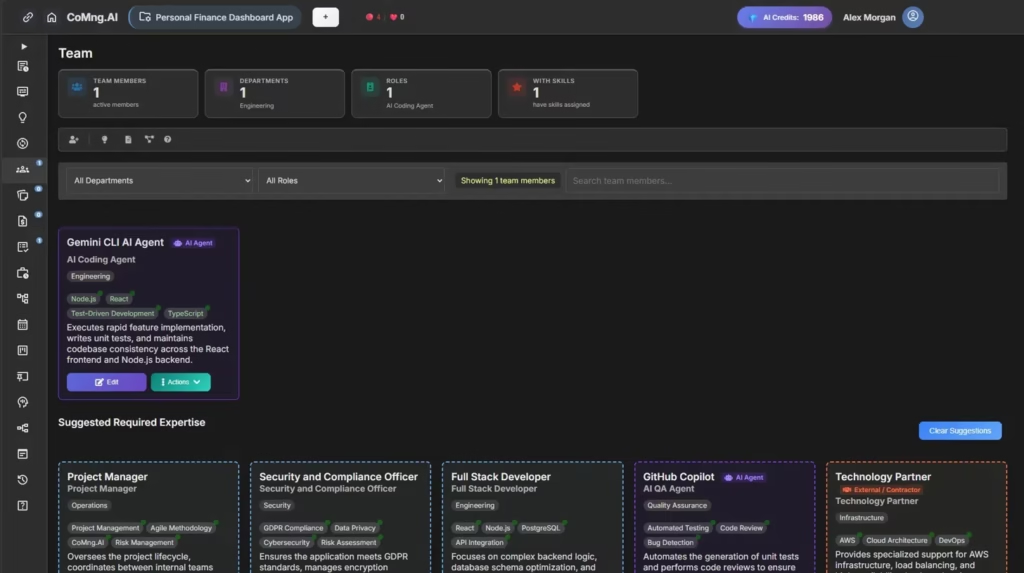
Step 2: Add the AI Agent as a Team Member
Go to the Team page and add Gemini CLI as a team member. Set the member type to AI Agent – CoMng.AI’s dedicated type for AI systems like Claude Code, Gemini CLI, GPT-4o, Devin, and GitHub Copilot.
Fill in the role (AI Coding Agent), department (Engineering), and skills. Click Suggest Details and the AI fills in the proficiency levels and expertise description based on Gemini CLI’s known capabilities.
Save the card. Gemini CLI now appears on the team page with a purple AI Agent badge, its skills (Node.js, React, TypeScript, Test-Driven Development), and the Actions menu that includes the Generate Work Order action exclusive to AI Agent members.
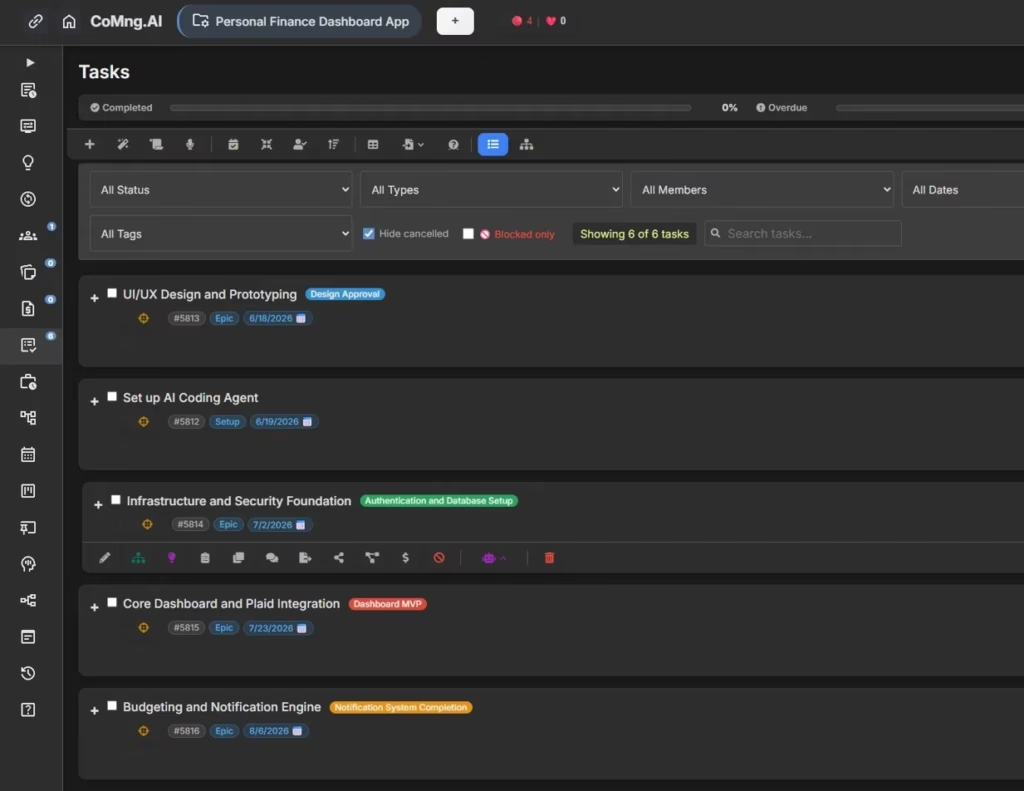
Step 3: Create Epics as Parent Tasks
Go to the Tasks page and create the top-level epics – the major delivery tracks for the project. CoMng.AI’s AI Brief tool can generate these from a short description, or you can create them manually.
For the Personal Finance Dashboard, the epics are:
| # | Epic | Milestone | Due Date |
|---|---|---|---|
| #5813 | UI/UX Design and Prototyping | Design Approval | Jun 18, 2026 |
| #5812 | Set Up AI Coding Agent | – | Jun 19, 2026 |
| #5814 | Infrastructure and Security Foundation | Authentication and Database Setup | Jul 2, 2026 |
| #5815 | Core Dashboard and Plaid Integration | Dashboard MVP | Jul 23, 2026 |
| #5816 | Budgeting and Notification Engine | Notification System Completion | Aug 6, 2026 |
Each epic is tagged with its milestone, showing exactly where it lands in the project timeline. The milestone tags – Design Approval, Dashboard MVP, Notification System Completion – are color-coded and link directly to the project’s milestone schedule.
Step 4: Break Each Epic Into Child Tasks
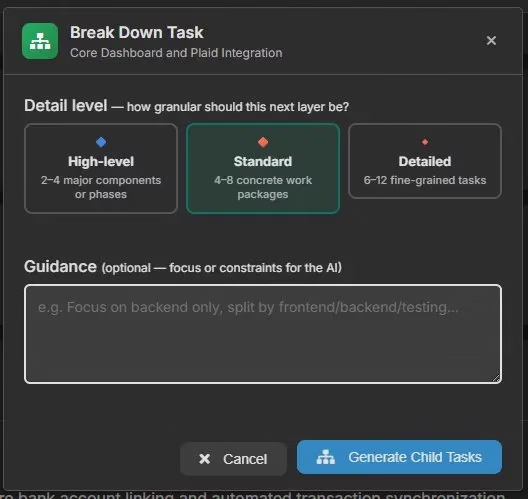
Click the Break Down Task action on any epic. A modal appears asking how granular the breakdown should be: High-level (2–4 major components), Standard (4–8 concrete work packages), or Detailed (6–12 fine-grained tasks).
Add optional guidance – “Focus on backend only” or “Split by frontend/backend/testing” – and click Generate Child Tasks. The AI reads the epic description and the full project context, then generates a realistic child task list.
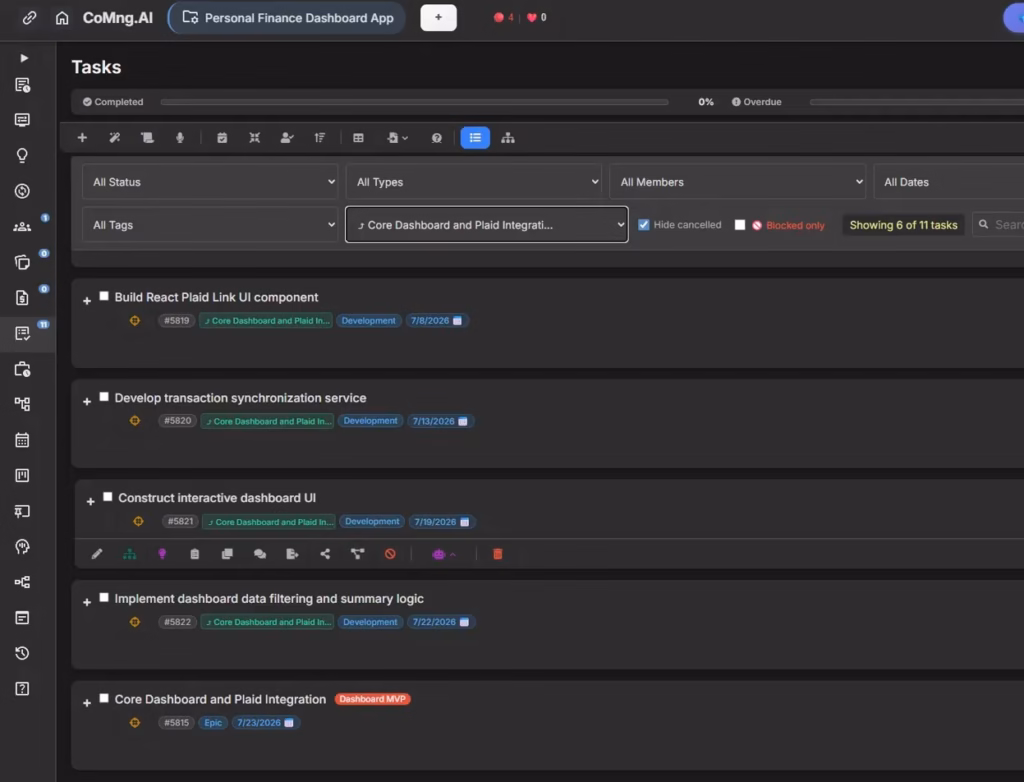
For the Core Dashboard and Plaid Integration epic, the AI generates six child tasks:
- Build React Plaid Link UI component (#5819) – due Jul 8
- Develop transaction synchronization service (#5820) – due Jul 13
- Construct interactive dashboard UI (#5821) – due Jul 19
- Implement dashboard data filtering and summary logic (#5822) – due Jul 22
- (plus additional tasks visible on full task list)
Each task is typed as Development, linked to the parent epic, and given a due date aligned with the Dashboard MVP milestone.
Step 5: Offload the Epic to the AI Agent
Here’s where ai agent task management separates from every other workflow.
With tasks assigned to Gemini CLI, hover over the Core Dashboard and Plaid Integration epic and open the AI actions dropdown. You’ll see a dedicated option: Offload to AI Agent.

Click it. CoMng.AI generates a structured markdown work order – addressed specifically to Gemini CLI AI Agent – and saves it as a project note instantly.
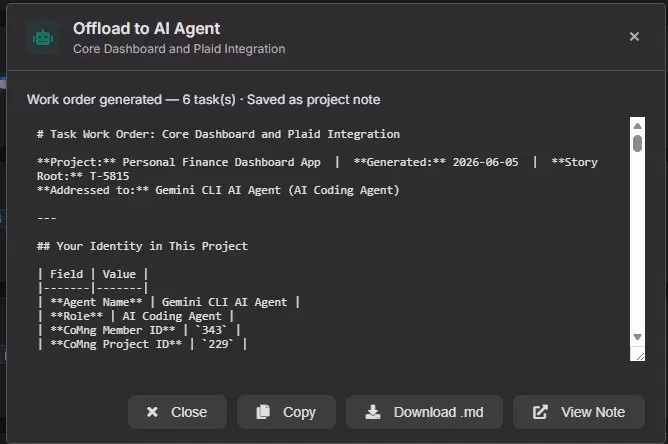
The work order includes:
- Agent identity – Gemini CLI’s name, role, Member ID, and CoMng Project ID
- All 6 assigned tasks with descriptions, due dates, priorities, effort estimates, and dependencies
- Full project context – goals, scope, tech stack, constraints
- Task IDs that Gemini CLI can use to call the CoMng.AI API and report progress directly
Click Download .md to save the file locally, or Copy to paste it straight into your terminal session.
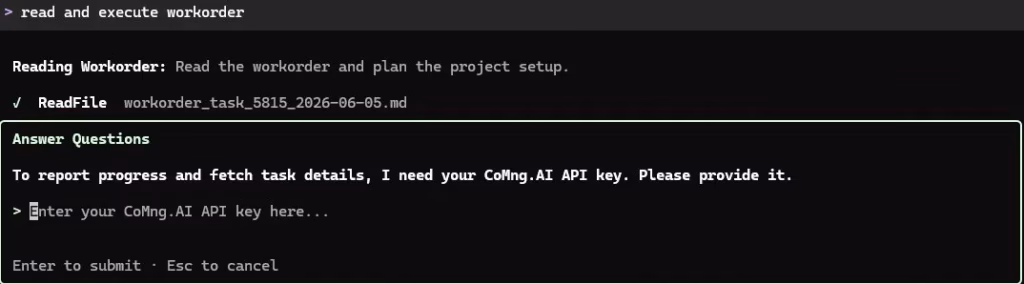
Step 6: Run the Work Order Through Gemini CLI
Open your terminal and start a Gemini CLI session. The work order file is named workorder_task_5815_2026-06-05.md. Gemini CLI reads it immediately:

Within seconds, Gemini CLI does something that makes this loop complete – it asks for the CoMng.AI API key so it can report its progress directly back to the project:
Step 7: Create an API Key for the Agent
Switch to CoMng.AI and navigate to API Keys. Create a new key scoped specifically to this project.
Name it something descriptive – “Gemini Finance Dashboard key” – select the Personal Finance Dashboard App project, set Permission Level to Both (read and write), and enable All Permissions. Set a rate limit (1,000 requests per hour is comfortable for development).
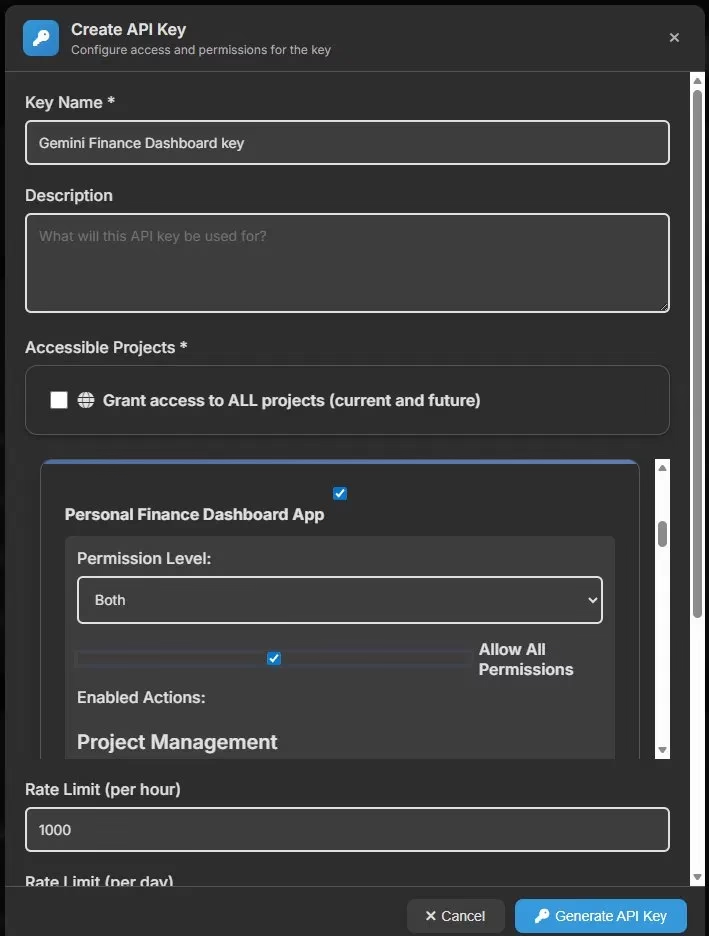
Generate the key and paste it back into the Gemini CLI prompt. The agent now has authenticated, scoped access to the project via the CoMng.AI REST API.
Step 8: Watch the Project Update Automatically
This is the payoff.
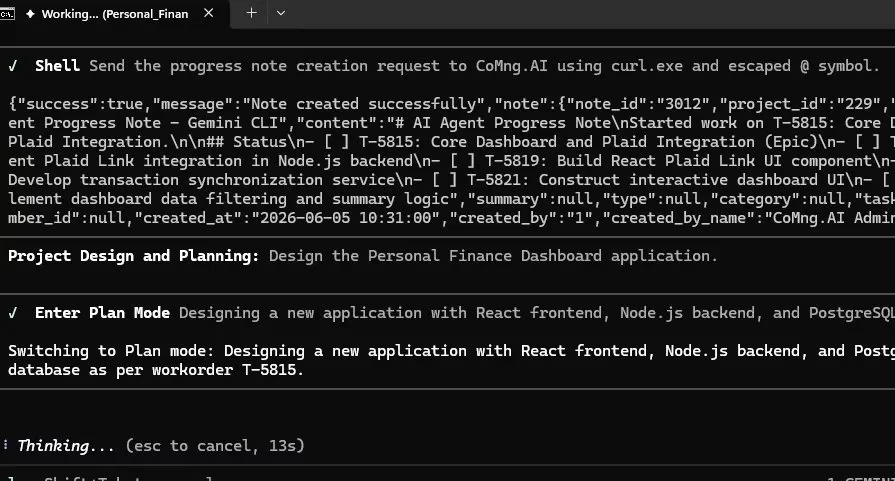
As Gemini CLI works through the tasks, it calls the CoMng.AI API to log its progress. Within seconds of starting work, a new note appears in the project:
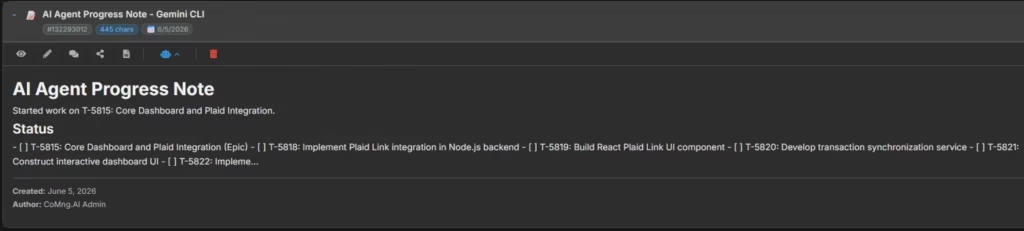
Back in the terminal, you can see exactly what happened. Gemini CLI sent a curl request to the CoMng.AI API to create the note, received a success response with the note_id, and immediately switched into Plan Mode – designing the React frontend, Node.js backend, and PostgreSQL database structure as per the work order:
The project board now reflects real progress. Tasks get updated as work completes. Notes document what was built and any decisions made. The entire delivery is traceable – not buried in a chat window.
What This Loop Actually Changes
The difference between pasting prompts into a terminal and running an AI agent through CoMng.AI isn’t just organizational – it’s structural.
| Without CoMng.AI | With CoMng.AI |
|---|---|
| Agent has no project context | Agent receives full task + project brief |
| Every session re-explains scope | Work order carries persistent context |
| No traceability of what was done | Tasks, notes, and activities log all output |
| PM manually updates status boards | Agent updates project via API as work progresses |
| No dependency awareness | Work order includes all task IDs, dependencies, blockers |
| Agent output lives in a chat window | Deliverables linked to tasks, noted in knowledge base |
This is what ai agent task management looks like when it’s done right. Not a chat session. A structured, auditable, context-rich execution loop – where the project manages the agent, and the agent reports back to the project.
Getting Started
If you’re running any AI coding agent – Claude Code, Gemini CLI, GPT-4o, Devin – without a structured project behind it, you’re leaving quality and speed on the table. The agent can only be as good as the context you give it.
This entire workflow – project creation, epic breakdown, AI Agent setup, work order generation, and live progress tracking – takes about 20 minutes to set up for a new project.
Ready to try it? Start your free CoMng.AI Account and add your first AI Agent team member today.
Leave a Reply